/**
 * 隐藏软键盘
 *
 * @param view
 */
protected void hideKeyboard(View view) {
    InputMethodManager imm = (InputMethodManager) view.getContext()
            .getSystemService(Context.INPUT_METHOD_SERVICE);
    if (imm != null) {
        imm.hideSoftInputFromWindow(view.getWindowToken(), 0);
    }
}
作者:root
把VideoView设置为静音
// 设置准备完成监听
mVideoView.setOnPreparedListener(new MediaPlayer.OnPreparedListener() {
    @Override
    public void onPrepared(MediaPlayer mp) {
        // 准备完成后开始播放
        mp.start();
        // 设置静音
        mp.setVolume(0, 0);
    }
});
参考链接:
Socket通讯工具类
import java.io.IOException;
import java.io.InputStream;
import java.io.OutputStream;
import java.net.Socket;
import java.util.concurrent.ExecutorService;
import java.util.concurrent.Executors;

/**
 * Socket通讯工具类
 */
public class SocketUtil {

    // 线程池
    private static final ExecutorService ThreadPool = Executors.newCachedThreadPool();

    /**
     * 发送Socket消息
     *
     * @param targetIP   目标IP
     * @param targetPort 目标端口
     * @param msg        消息
     * @param callback   回调
     */
    public static void sendSocketMsg(final String targetIP, final int targetPort, final byte[] msg, final SocketUtilCallback callback) {
        ThreadPool.execute(new Runnable() {
            @Override
            public void run() {
                try {
                    // 建立Socket连接
                    Socket socket = new Socket(targetIP, targetPort);
                    socket.setSoTimeout(1000 * 10);
                    // 写消息
                    OutputStream out = socket.getOutputStream();
                    out.write(msg);
                    out.flush();
                    // 读取消息返回
                    byte[] readBuffer = new byte[1024];
                    InputStream in = socket.getInputStream();
                    int size = in.read(readBuffer);
                    byte[] readBytes = null;
                    if (size != -1) {
                        readBytes = new byte[size];
                        System.arraycopy(readBuffer, 0, readBytes, 0, size);
                    }
                    // 关闭流和Socket连接
                    in.close();
                    out.close();
                    socket.close();
                    // 执行发送成功回调
                    if (callback != null && readBytes != null) {
                        callback.onSuccess(readBytes);
                    }
                } catch (IOException e) {
                    // 执行发送失败回调
                    if (callback != null) {
                        callback.onError(e);
                    }
                }
            }
        });
    }

    /**
     * 回调
     */
    public interface SocketUtilCallback {
        void onSuccess(byte[] result);

        void onError(Exception e);
    }
}
Android 自定义 MarqueeView 实现跑马灯效果 – 使用说明
Retrofit2结果拦截器和判断异常类型
结果拦截器
Interceptor responseInterceptor = new Interceptor() {
    @Override
    public Response intercept(Chain chain) throws IOException {
        Response response = chain.proceed(chain.request());
        if (response.body() != null) {
            String json = response.body().string().replace("\"data\":null", "\"data\":{}");
            ResponseBody body = ResponseBody.create(response.body().contentType(), json);
            return response.newBuilder().body(body).build();
        }
        return response;
    }
};
判断异常类型
@Override
public void accept(Throwable throwable) throws Exception {
    if (throwable instanceof HttpException) {
        String json = ((HttpException) throwable).response().errorBody().string();
    }
}
Android AlertDialog背景透明
1.定义AlertDialog透明样式
<style name="TransparentDialog" parent="Theme.AppCompat.Dialog">
    <item name="android:windowBackground">@android:color/transparent</item>
</style>
2.创建AlertDialog
View view = LayoutInflater.from(context).inflate(R.layout.dialog_sure, null, false);
AlertDialog sureDialog = new AlertDialog.Builder(context, R.style.TransparentDialog).setView(view).create();
参考链接:
安卓图像数据格式
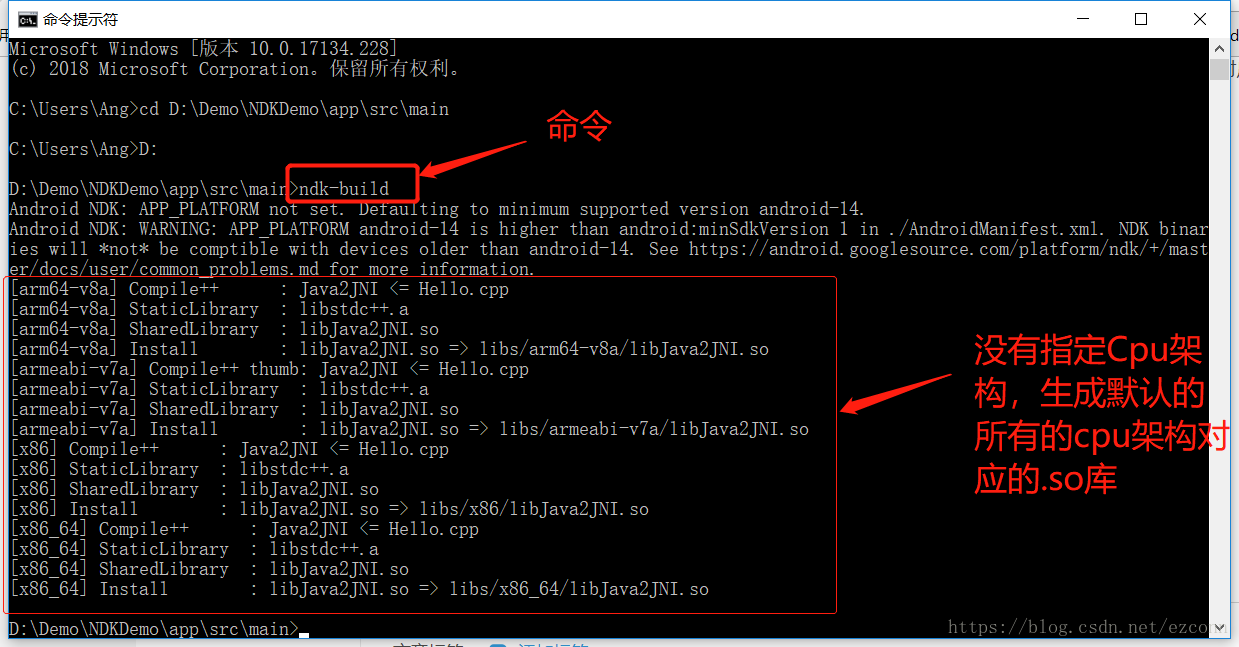
Android NDK开发,使用ndk-build编译
节选自:Android NDK开发,使用ndk-build编译
手动编译.so文件
从步骤八开始的第二种方式,不指定AndroidStudio编译工具(Cmake或者ndk-build),直接手动生成.so库
a, cmd 或者Android studio的Terminal 中进入jni的上一级目录
b, 输入ndk-build命令,在jni同级的目录中生成了一个libs文件夹,里面生成了各个cup架构对应的.so文件,